Меню:
Creation and popularity of Git is closely related to development of Linux. At first it was used to for Linux kernel development, but now it's used in the many other open source projects.
We can work with Git from Emacs using several packages — either use modules for VC и DVC packages, or use specialized packages, like: git.el, emacs-git, magit & egg. In first case we work with Git through standard interfaces of VC & DVC, while other packages implement interfaces, that allow user to get access to full Git power. In this article I'll describe only specialized packages.
The git.el package
Installation of package
Installation of git.el is very simple — it comes as part of the Git's distribution and
stored in contrib/emacs/ subdirectory. To compile package you need just run make command,
that could also be used to install the package (by default, package is installed into
$HOME/share/emacs/site-lisp, but you can change this behaviour by passing emacslispdir
parameter to make, or just copy all files to the directory, where Emacs can find them).
To use git.el, you need to put following line into your initialization file:
(require 'git)
and after evaluation, you'll get access all commands, provided by this package.
Working with git.el
Work with package always starts with execution of git-status command, that asks user about
directory name in which it will search for Git repository. After that, it will perform
analysis of repository state. After this analysis, the package creates the *git-status*
buffer, that will be used to perform commands on files. On the picture below you can see
how this buffer looks like (at the bottom of picture you can see output of diff command).
In this buffer the git-status-mode is enabled, that defines set of commands (and
corresponding key bindings, many of them match the key bindings of PCL-CVS package — this
make transition to Git more easy). All these commands are available only in this buffer,
and couldn't be used outside of it.

User can navigate in the buffer using arrow keys, or with commands git-next-file (keys n
or SPC) and git-prev-file (p key). For many commands user can specify numeric prefix,
that will change behaviour of command.
By default, all commands are executed on file under cursor. But user can also select
several files and commands will be executed on them. Selection is performed with
following commands and key bindings: m key (git-mark-file) marks current file and moves
cursor one line below, M key (git-mark-all) marks all files in this buffer. To remove
selection mark you can use u key (git-unmark-file) or DEL key (git-unmark-file-up), but
first command moves cursor one string down after removing of selection, but the second, do
this to one string up. To remove selection mark from all files you can use the git-unmark-all
command (M-DEL key binding). To inverse selection you can use the git-toggle-all-marks
command(T key).
The same as in the PCL-CVS package, you can open current file with the git-find-file
command (key RET or f). To open file for view you can use the v key (git-view-file). In
case, if you've got conflicts during merge, you can run conflict resolving command —
git-resolve-file (R key).
You can add new files to repository with the git-add-file command (a key), and remove
files with the git-remove-file command (r key). To hide files that are stored in
directory, but not registered in repository, you can put them into list of ignored files.
This could be done with the git-ignore-file command (i).
Committing of changes is performed with the git-commit-file command (c key), and reverting
of changes — with the git-revert-file command (U key). User can view change log for
repository with the git-log-file command (l key).
The d key is prefix key for all changes-related commands. Most important command among
them is the git-diff-file command, that you can call with the = or d
= keys. The git-diff-file-base command (d b) allows you to find differences
between current and base file. And with the git-diff-file-idiff command (d e) you can
interactively view changes in current file. The git-find-file-imerge command (d E) allows
user to open current file for interactive application of changes. Other commands allow
you to see changes relative to main branch —
git-diff-file-merge-head command (d h),
relative to versions of files before merges —
git-diff-file-mine command (d m), etc.
Full list of commands you can get from help for this mode (C-h m key).
Other command allow to refresh status buffer —
git-refresh-status command (g key), resign
from the buffer —
git-status-quit (q), remove processed files from list —
git-remove-handled (x) and get help about mode —
git-help (h or ? keys).
Customization
You can customize package with standard customization routines of Emacs. Corresponding
customization group has name git and allow to specify different Git settings and faces
that are used to display data.
The git-emacs package
The git-emacs package implements almost the same functionality, as the git.el package, but it also has some improvements, mostly in the user interface.1 The package's home page contains detailed illustrated user manual, so user can quickly start to work with this package.
Installation and customisation
You can download the git-emacs package, together with auxiliary packages, from the developer's repository, and after download, just put them in corresponding directory, and add following line of code in Emacs's initialisation file:
(require 'git-emacs)
Initial customisation of package could be performed with the git-config-init command, that
will set several variables, that are necessary for work with Git. Values for other
variables could be installed via customisation group with name git.
Work with existing repository
User can start to work with existing repository by running the git-status command, and
after execution a new buffer will be created. This buffer is used to display information
about repository's state. For this buffer the git-status-mode major mode is used, and
there are lot of commands for work with files and repository itself. Commands could be
executed via key bindings, or by using corresponding items in Emacs-Git menu, that will
displayed when git-status-mode is enabled.
Navigation between buffer's objects is could be performed with several commands: besides
traditional commands like n (git---status-view-next-line) and p
(git--status-view-prev-line), that are used to move to next and previous file, there are
also commands N (git--status-view-next-meaningfull-line) and P
(git--status-view-prev-meaningfull-line), that move cursor between modified files. Also
exists commands to move to first — the < key (git--status-view-first-line), and last —
the > key (git--status-view-last-line) line in files list.
As in other packages for work with version control systems, user can open file by moving
to it, and pressing o or RET keys (git--status-view-open-file). Besides this, user can
open file for view with v key (git--status-view-view-file).
Operations could be performed as with separate files, and with groups of marked files. To
set mark on concrete file you can use m key (git--status-view-mark-and-next). To remove
mark from file user can use u key (git--status-view-unmark-and-next), that removes mark
and move cursor to the next file. The SPC key (git--status-view-toggle-and-next) is used
to toggle mark on file. Besides this, with the * key(git--status-view-mark-reg) user can
mark files, whose names match to given regular expression.
To perform operations on files there are several commands. Addition and removal of files
is performed with commands git--status-view-add (the a key) and git--status-view-rm (the d
key). If you want to rename file, you can use the git--status-view-rename command, that
is bound to r key. And sometime, when in directory exists files, not registered in
repository, you can use special command to put them into list of ignored objects. This
command is bound to i key (git--status-view-add-ignore), and execution of this command
will lead to creation of new entry in the .gitignore file.
Creation of new repositories
The git-emacs package allows to create new repositories using two different ways — by cloning existing repository, or by importing files from the given archive file.
To clone existing repository exists the git-clone command, that asks user for a name of
directory, where new repository will created, URL of existing repository, and if
necessary, then also ask for user's name and e-mail. After entering of all needed
information, the asynchronous process of cloning will run, and after it will finished,
user will see message in mini-buffer.
To import files from archive file, user can run the git-init-from-archive command, that
after run will ask for archive file name, name for directory for new repository, and other
needed data, and starts process of import of files from archive. And at the end of this
process, user should enter message with description of this change, and confirm import
with C-c C-c keybinding, as for normal commit.
Work with changes
To view changes in repository, user can execute command git--status-view-diff-file (the
= key), that will create a new buffer, containing changes in current file.
This operation could be also performed with global git-diff command. Both commands ask
user for revision number to compare with, and than use ediff to display changes.
To commit changes to repository exists command git-commit-all (the c key)2, that after
run, will create a new buffer, where user can enter description of the change, and finish
operation with C-c C-c keys.
Often is required to merge changes from other branches of development. This task could be
performed with the git-merge command, that , when executed, will ask for name of branch or
tag from which you want to merge changes, and than, after confirmation of your choice, the
merge will executed. And if during merge process, repository become to conflicting state,
then user can use the ! key (git--status-view-resolve-merge) to start process of conflicts
resolving, using ediff-merge.
History of changes
To get information about history of changes in repository, the git-emacs package defines
several commands: the git-history command is used to get history of changes for whole
project. And to get information about history of changes in concrete files, user can use
the git-log command. Both these commands create a separate buffer, that contains detailed
information about changes.
Users, who like the gitk utility, can run it directly from Emacs. This could be done
either directly from the status buffer, using the k key (git--status-view-gitk), either
using the gitk command.
User also can see information about which parts of file was changed in concrete version.
In Git user can obtain this information with the git blame command, and for integration
with Emacs the git-blame package was created (it's described below). User can obtain this
information by navigating to needed file in the status buffer, and pressing the ? key
(git--status-view-blame). This will lead to opening of file and enabling in it the
git-blame-mode minor mode, that is used to display corresponding information.
Work with tags & branches
The git-emacs package also supports work with several branches of development in the same
repository. To work with them, user can run the git-branch command, and after it
execution, a new buffer will created, holding list of all existing branches in current
repository. User can work with branches using key bindings, or items from the Git-Branch
menu, that is displayed when buffer is created. The current branch is always marked with
* symbol.
Pressing of the c key will lead to prompting of user for a name and creation of new
branch. To switch to another branch user can navigate to needed item in list, and
pressing s or RET. And from this buffer, user can also delete unneeded branches by
pressing the d key.
If you hadn't performed the git-branch command, then you can still create a new branch.
This could be done with git-create-branch or git-checkout-to-new-branch commands.
User also can work with branches directly from the status buffer. Pressing to the z key
(git-branch) will lead to creation of a new buffer, as when user directly execute the
git-branch command. And to switch to another branch, user can simply press the b key
(git--status-view-switch-branch).
Work with tags is also pretty simple — you need to execute one of the git-tag or
git-snapshot commands, that will ask for tag name, and create it. And later you can
return to given tag by executing the git-checkout command and specifying name of tag. You
can also use tags as a starting point of new branches. To do this, you need to specify
name of the tag as a parameter for the git-checkout-to-new-branch command.
The magit package
The magit package provides interface for work with Git from Emacs. Comparing with other packages, this package provides more precise mapping of Git's ideology to Emacs interface, but use slightly different, comparing with other packages, set of key bindings, so it's recommended to read user's manual first.
Installation and customisation
Installation of package is very simple — you need to retrieve sources from the repository, specified on the project's home page, and install it, using following commands:
sh ./autogen.sh
./configure [опции]
make && make install
After installation, just add following line to your initialisation file:
(autoload 'magit-status "magit" nil t)
This command will load package when on first call of the magit-status command.
Basics of work with package
Like in other version control support packages, work with repository is starting by
executing one command. For magit package this is the magit-status command, that, when
executed, will ask for name of directory with repository, and than will create a new
buffer with name *magit: directory_name*, that will hold information about actual state of
repository. All commands are executed from this buffer, either by using key bindings,
either via the Magit menu. The buffer *magit: directory_name* will look like this:
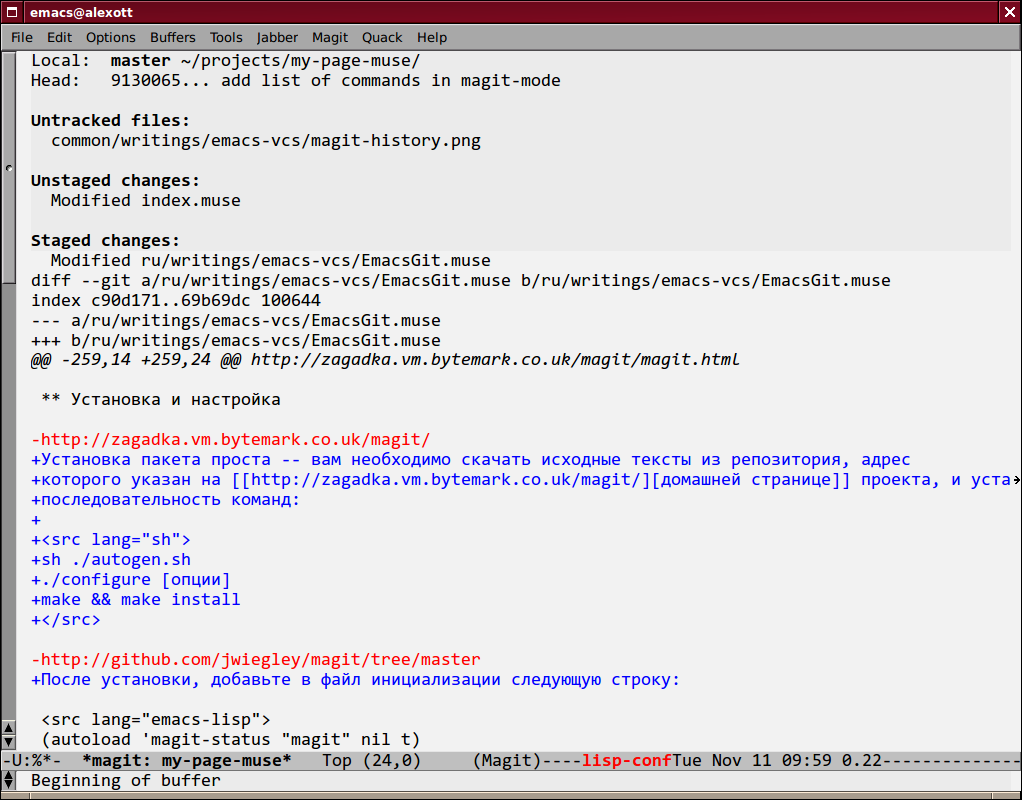
This buffer contains several lists of objects, matching to different states of objects in Git's repository:
- unknown objects (untracked)
- saved (stashed) objects
- modified object, but not added to commit list (unstaged)
- modified objects, added to commit list (staged)
- committed changes, but not pushed to source repository (unpushed).
Besides this, if lists staged & unstaged aren't exists, then all modified files are listed in list with status changed.
User can move between objects in list by using arrow keys, or keys n & p. Besides this,
user can quickly move between groups of files with different states by using numerical
keys: 1 (magit-jump-to-untracked), 2 (magit-jump-to-unstaged), 3 (magit-jump-to-staged)
and 4 (magit-jump-to-unpushed).
Some operations, that could be performed on objects, behave differently depending on state
of object. For example, if you press the k key (magit-discard-item) on unknown object,
then it will deleted, but if you press it on modified object, this will only lead to drop
changes from that object. And if you'll apply it to the saved (stashed) change, then this
change will deleted.
If you don't want to delete unknown objects, and don't want to register them in
repository, then you can ignore them with one of two defined commands: the i key
(magit-ignore-item) will put current object into ignore list located in the .gitignore
file, and the I key (magit-ignore-item-locally) will put current object into the
.git/info/exclude file, that is used to ignore objects only in current repository.
Besides this, if you'll specify prefix argument before pressing one of these keys, then
commands will ask for name of file to ignore, and you can enter name or regular
expression as answer.
And, as usually, you can open current object by pressing the RET key (magit-visit-item).
Work with changes
User can commit by using one of two commands — either c (magit-log-edit), or C
(magit-add-log). They both open a new buffer, where user should enter description of
change, but slightly differs in decoration of this description. For first command, user
can enter description as free form text, while for second, buffer will contain name of
files, so log will look like standard ChangeLog files.
But I need to mention, that changes are committed differently, depending on the state of
repository. If exists only list of modified (changed) objects, then these commands will
commit changes for files in this list. If user wants to commit only some objects, then he
need to move them into the list of objects to commit (staged), and perform commit only
after this operation. To move object into commit list, user can use the s
key(magit-stage-item), (for unknown (untracked) objects, this will add object into
repository), and remove file from this list, user can with the u key (magit-unstage-item).
To move all objects into commit list, we can use the S key (magit-stage-all), and to
perform reverse operations — the U key (magit-unstage-all).
Besides this, the package also can save changes without committing them into repository,
so user can apply them some time later. This is very useful, when you don't want to
commit changes, but you want to perform some operation, that requires "clean" repository.
You can save changes by executing the magit-stash command, that is bound to z key, and
that puts changes into list of saved (stashed) changes. Than you can perform all needed
operations, and after them, apply saved changes to repository (this is could be done by
using the a key). And, as was mentioned above, you can delete saved changes using the k
key.
The magit package can display changes using several ways. To view changes in concrete
object, we can use the TAB key (magit-toggle-section), that will display changes in
current object. To hide changes, user can use the same key.
To view changes, made in the current branch, user can press d key
(magit-diff-working-tree), and after asking a name of branch, with which the comparison
should be performed, it will create a new buffer, containing information between current
version and given branch. To make comparison between two arbitrary branches (or tags),
user can use the D key(magit-diff), which will ask for name of two branches, and perform
comparison. To scroll the content of buffer, user can use keys SPC (scroll down) and DEL
(scroll up).
And if user wants, he could return to the clear state of repository by discarding the
changes with the x key(magit-reset-head), that will rollback repository to the given
changeset (by default this is last committed changeset). There is also
magit-reset-working-tree command (the X key), that will revert changes and return
repository to the last committed change, without asking for name of changeset.
Work with history of changes
To see history of changes in repository, user can use either l key (magit-log-head), or L
key (magit-log). First command displays history of changes for current branch of
development, while second, displays history for range, that it asks from user. Example of
output, produced by these commands, you can see on the picture below. I want to mention,
that magit tries to display changes in different branches, like the gitk command do.
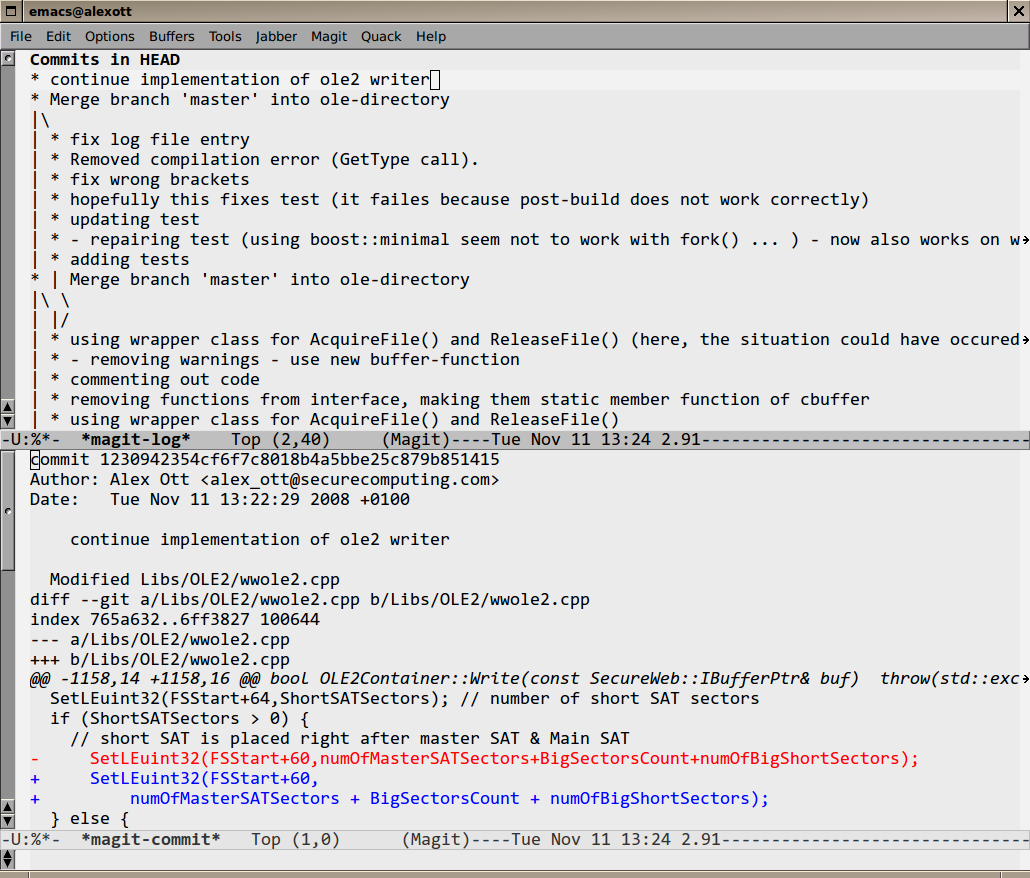
When moving along the history of changes, user can get detailed information about
changeset under point by pressing the RET key. Besides this, user can view changes
between any two changesets. To do this, he need to move to first changeset and mark it
with the . key (magit-mark-item), and than, move to the other changeset, and display the
changes by pressing the = key (magit-diff-with-mark). This will create a new
buffer, where corresponding information will displayed.
User can execute different commands on changesets. Using the a key (magit-apply-item) he
can apply current changeset (changeset under point) to current branch of development. But
he will need to explicitly commit new changes, or use the A key (magit-cherry-pick-item),
that will also apply current changeset, but also will automatically commit changes to
repository. And to revert changes, done in changeset under point, user can use the v key
(magit-revert-item), that will apply patch in revert order.
Besides working with history of changes for whole repository, user can also look
changesets in local history (reflog). To do this, he can use either h key
(magit-reflog-head), that displays reflog for current branch of development, or H key
(magit-reflog), that displays changesets for any two points in local history. Both
commands create a new buffer, in which user can execute commands, described above.
There is also set of commands, that allows user to rewrite history of changes. This set of
commands is more handy than combination of x (reset head) and a (cherry pick). All
commands in this set have r as common prefix. To start work, you need to press r s, and
you will asked for name of revision, starting from which you can start rewriting. And all
following changesets will put into special list of pending changes. Than you can use a, A
& v keys to apply and revert changes in order, that you need. And applied changesets will
change their status from * to . (dot). You can also explicitly change status of changeset
with r . and r * keys.
If something goes wrong, you can return to start of work by pressing r a, and work will
started from the revision, those name you enter with r s. And you can finish work by
pressing r f, that will apply rest of changeset in the same order, as they were in the
history of changes.
Tags, branches, and remote repositories
The magit package also provides enough set of commands for work with branches, tags & remote repositories, so almost all operations could be performed from the Emacs.
To create tags user can use keys t (magit-tag) and T (magit-annotated-tag). They both ask
user for a name of tag, but the second command will also ask for more detailed description
of the tag, so it could be much easier to find it later. After entering of tag's name,
package will create tag with given name, and using current repository state.
Work with branches is also simple. To create a new branch (and switching to it) user can
use B key (magit-create-branch) — it will ask user for a name of the new branch. To
switching between existing branches, user can use b key (magit-checkout), that will ask
for name of the existing branch (you can use name completion) and will switch to given
branch. And to perform git rebase user can use the R key (magit-rebase-step).
We can merge the changes between the branches. To perform automatic merge of changes from
given branch, user can use the M key (magit-automatic-merge), that will perform all
missing changesets, and commit them into repository. And if you want to review changes
before merging, then you can use the m key (magit-manual-merge). Both these commands
accept name of branch as an argument.
There are also several commands to work with remote repositories. The f key
(magit-remote-update) gets from remote (origin) repository list of changesets, missing in
current repository. These changes could be downloaded and applied with the F key
(magit-pull). Besides this, if user did right customization of repository, then user can
also use P key (magit-push) to push changesets into remote repository (currently,
supported only pushing into origin.
Some time ago, the support of the git svn was added to the package. If current repository
was created from the Subversion, then user will get access to the two additional commands:
N r (magit-svn-rebase) will perform git svn rebase command, that performs synchronisation
with the Subversion, and N c (magit-svn-dcommit), that will push your changesets from
the Git to Subversion.
The egg package
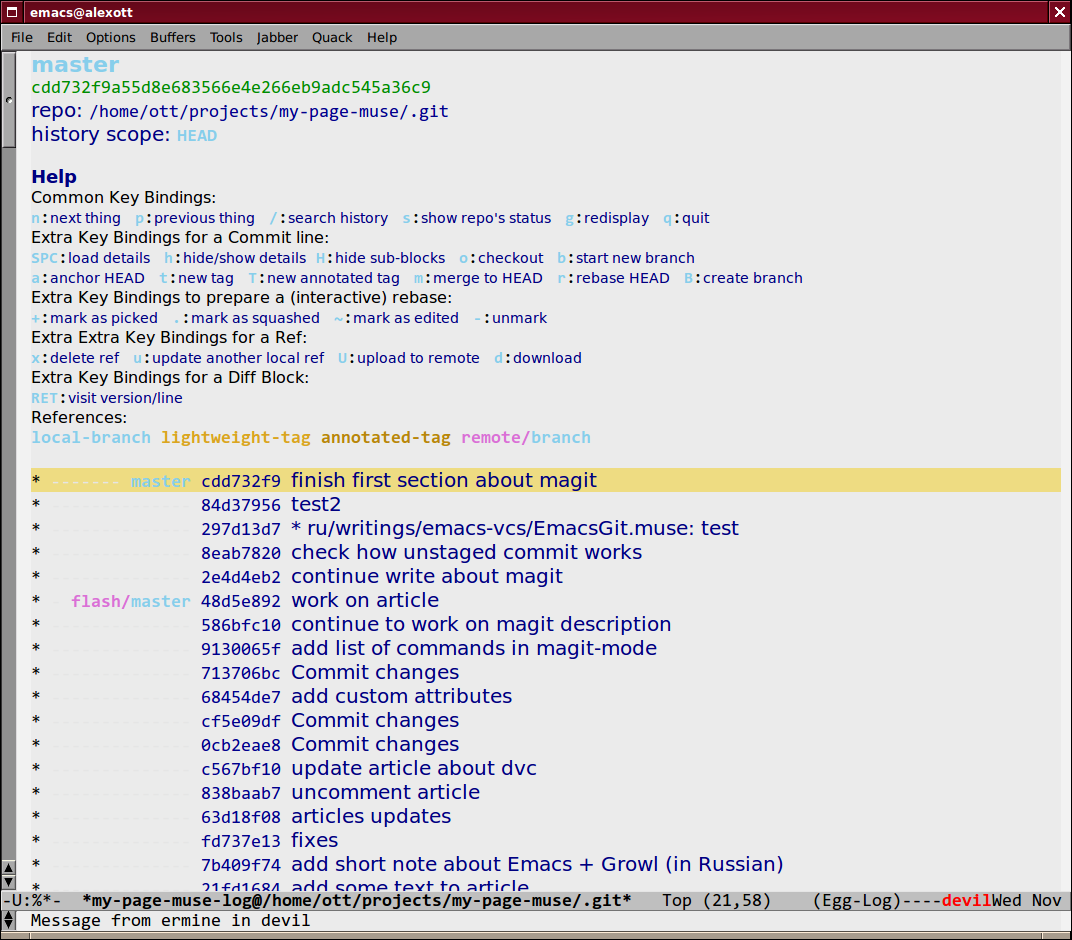
The egg package is the fork of the magit package, described above. Main difference from magit is an improvements in the users interface (example of interface to work with history of changes you can see on the picture below) and correct work on MS Windows, all other functional is almost the same as in magit. This package is available to download from the developer's site.
Auxiliary packages
In this section I'll describe some of the auxiliary packages, that implements some functionality, missing in the many packages for work with Git.
git-blame
This package was written by David Kågedal and it's available as a part of git-emacs package, described above. To load the package, put following line into your initialization file:
(require 'git-blame)
or you can use following, if you don't want to load package until first call:
(autoload 'git-blame-mode "git-blame" "Minor mode for incremental blame for Git." t)
To use this package in some buffer, user should enable in it the git-blame-mode minor
mode. This will lead to change buffer's decoration — each line of buffer, will have
their own decoration, depending in which version it was modified. And when you'll
navigate through buffer's lines, the mini-buffer will display information about version,
in which current line was modified.
gitsum
The gitsum package allows to perform partial commits into the Git repository, like when you working with darcs via the darcsum package. To install this package, you need to download it from repository, put into directory, where Emacs will able to find it, and put following line into initialization file:
(require 'gitsum)
The gitsum package provides to user only one command —
gitsum, that allows user to
perform partial commits from Emacs. To do this, user should run this command from buffer
with file, registered in the Git repository. And after execution of this command, a new
buffer will created, containing all changes, made in current repository.
In this buffer, user can move between separate changes (by using n & p keys), and between
modified files (by pressing N & P keys). If you don't want to include some changes into
commit, then you can press k to hide them. If you don't want to include all changes from
some file, you can press K to exclude all changes from commit. And after you'll prepare
list of changes to commit, you can press c or C-c C-c to do actual commit (after entering
of description for change). Besides this, there is also one very useful key binding —
C-c C-s, that splits one change into two, so you could commit them separately.
I want to mention, that gitsum package can automatically plug into git.el package, so you
could call it from the git.el's status buffer by pressing the s key.
egit
This package implements functionality, currently missing from the git.el package. This is mostly extensions for work with history of changes, and with concrete changes. To install package, you need to download it from repository, install it into right directory, and add following code to the initialization file:
(autoload 'egit "egit" "Emacs git history" t)
(autoload 'egit-file "egit" "Emacs git history file" t)
(autoload 'egit-dir "egit" "Emacs git history directory" t)
The package defines three commands, that have similar functionality, but working with
different objects. The egit command works with whole repository, the egit-dir — with
concrete directory in repository, and the egit-file with concrete file in repository. One
difference between them is that egit will ask user for information about branch or tag
name for which it should display information, and also about number of records to display.
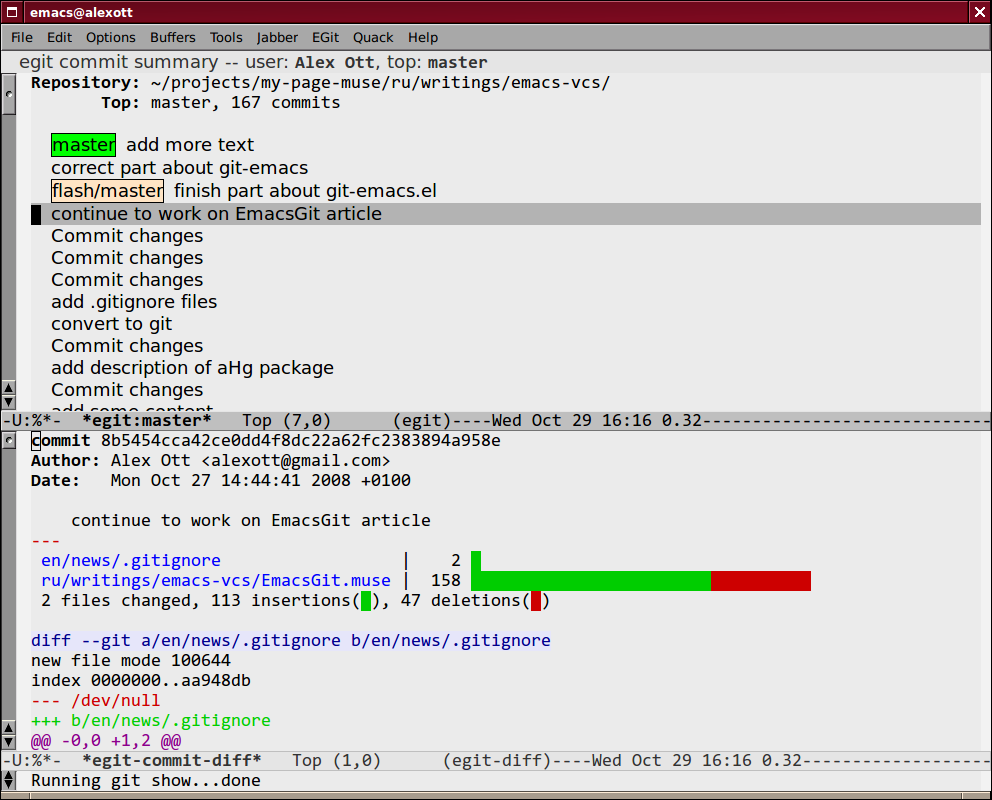
All three commands create a separate buffer, that is used to display history of changes,
and in which the egit-mode mode is enabled. This mode allows user to execute different
commands either by using key bindings, or by selecting them from the EGit menu. An
example of this buffer you can see on picture below.
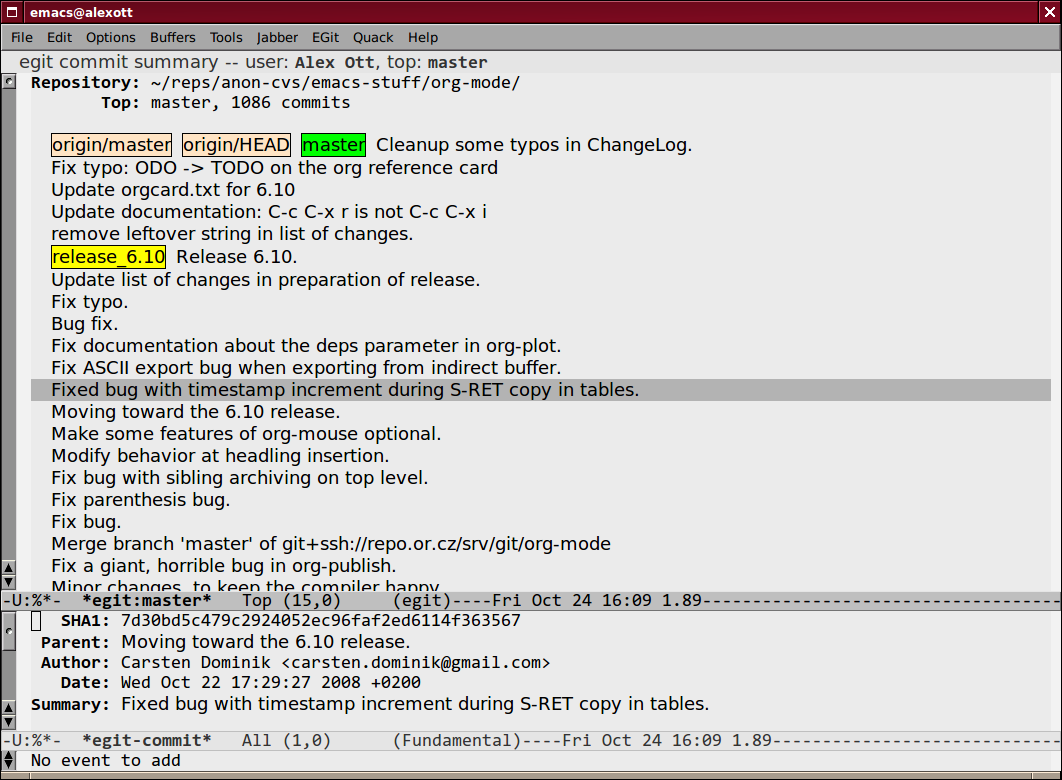
To move inside the buffer user can use keys n (C-n) and p (C-p), or arrow keys. By
default, when you move between records, the package shows a basic information about
current changeset — author's name, date of commit, short description of the change, etc.
Besides this, user can see full description of change by pressing RET or right arrow key,
or list of modified files (the f key), or diff between this and previous version by
pressing the d key (the example you can see on picture below).
Besides looking for history of changes, user can also apply selected changesets to the
current repository with the egit-cherry-pick command (the c key). And it's also possible
to rollback some changes by executing the egit-revert command, that has no key binding,
and only item in the EGit menu.
1. I need to mention, that it has some inconvenience — some commands are same as in the <em>git.el package, so you couldn't use them simultaneously. And also, this package explicitly set global ido-mode, so not always handy for users, that are using another packages.
2. This command could be executed not only from the status buffer, but also via global
key binding C-x v v.
Last change: 24.09.2017 11:45
